MicroTally Manual
Last Updated 04/21/2015
Table of Contents
2.1 Organization of the MicroTally controls:
2.2 Connecting to the MicroTally.
2.3.2 The 12 basic tally keys:
2.3.3 The 4 extra corner tally keys:
2.4.1 Example #1: Doing a Simple Intersection Count Study:
2.4.2 Example #2: Doing an Intersection Count Study, keeping track of trucks:
2.4.3 Example #3: Doing an Intersection Count Study, keeping track of pedestrians:
2.4 4 Example #4: Doing a manual street count with FHWA classifications (non-intersection):
2.4.5 Example #5: Doing an Intersection Count Study, keeping track of up to 7 types of vehicles:
2.4.6 Example #6: Doing a Simple Intersection Count Study from Video:
3.0 When Things Don't go Right.
3.1 The MicroTally is beeping Rapidly when in the “Run” position.
3.2 Data does not seem to be correct.
3.3 The MicroTally does not “beep”.
3.4 My MicroTally won’t connect to WinTally.
Congratulations! You are in possession of one of the finest electronic manual tally boards made. The VehicleCounts.com MicroTally is a hand held electronic tally counter. It is designed to allow manual counting and timing of events, traffic intersections, vehicle classifications, either in the field, or in the comfort of your office from video recordings made of the scene to be counted. The keypad layout has been optimized to simulate a street intersection to ease data entry, however, it may be used for anything that needs manual counting or timing. The unit was designed to minimize operator errors by not requiring any pre-study setups and a variety of subtle guides to insure the unit is counting and you are pressing the correct keys.
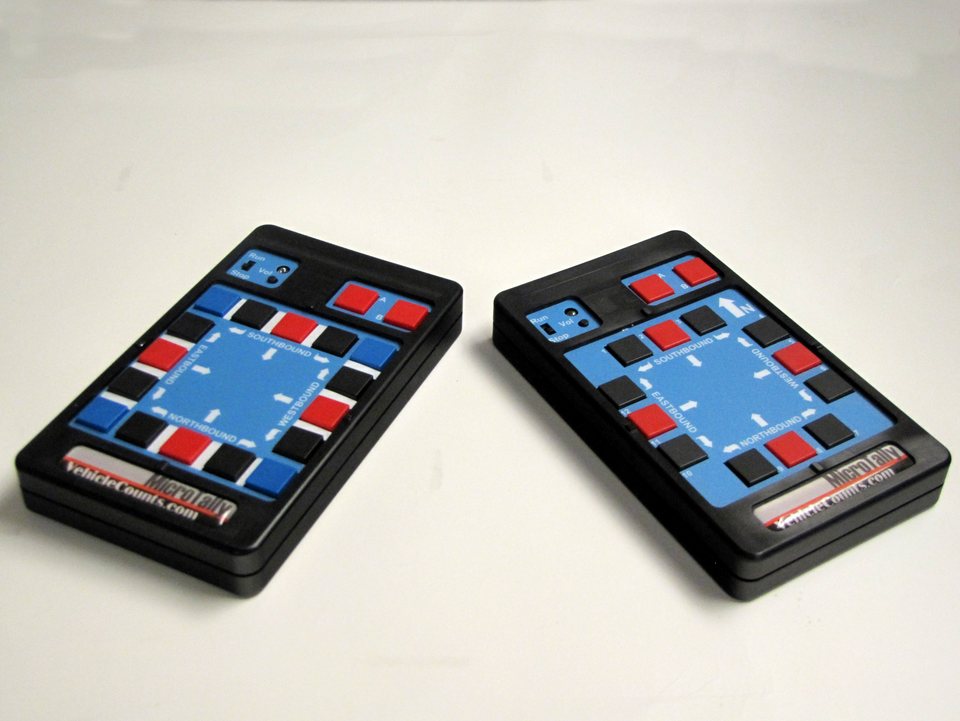
The MicroTally comes in two models: The MicroTally 14, and the MicroTally 18.
The MicroTally 14 features 14 tally keys, a run/stop slide switch, a button for "beeper" volume, a LED indicator for "silent" operation and a standard DB9 connector for communications with a PC.
The MicroTally 18 features 18 tally keys, a run/stop slide switch, a button for "beeper" volume, a LED indicator for "silent" operation and a standard DB9 connector for communications with a PC.
The units operate from a 3.6V Lithium battery which should last more than 5 years. When the battery needs replacing, it needs to be returned to the factory and for a standard repair fee the battery will be replaced. It is not user-replaceable.
When recording, the MicroTally gives the operator feedback in the form of audible beeps (or a flashing LED), for each key pressed. There are up to 4 different pitch beeps to indicate RED keys, BLACK keys, BLUE keys, and a separate tone for the A and B keys.
If you are doing turning-movement studies, the keys in the intersection layout are color coded RED for straight through, BLACK for turning (left or right), BLUE for pedestrians (MicroTally 18 only), and RED for the function keys. Also, there are small raised bumps adjacent to the 4 RED keys in the intersection layout to aid in locating the buttons without having to look down.
The MicroTally individually records all keys that are pressed and the "time" they were pressed. This feature gives the MicroTally tremendous flexibility in the processing of the data. Later, after download by our WinTally software, these time-stamps are converted into the appropriate counts and reports. The 14 or 18 tally keys can be easily configured to act in different ways. By default all keys are simple tally buttons.
WinTally is Windows® based software that works with the MicroTally. It can run on any desktop, or laptop running Windows® and having a serial or USB port with an appropriate USB to serial converter. WinTally communicates with the MicroTally via a standard serial cable. WinTally is used to configure and reset the MicroTally, download data from the MicroTally, save the data to files, export the data to spreadsheets or databases, view the data, configure keypad assignments and generate a variety of standard reports.
Most of the examples in this manual are related to vehicle counting. It is assumed that you are familiar with the various terms and techniques involved with vehicle counting.
Study. A term used in the industry to specify a contiguous (no breaks) counting session.
Tally. Means sum, or total.
Time-Stamps. In the MicroTally units all button presses are recorded, along with the time they were pressed.
Turning Movement. A term used to indicate the exit direction of a vehicle that has entered an intersection (turning left, right, or going straight) at an intersection.
Vehicle Classification. The type of motorized vehicle, such as car, delivery truck, bus, etc. Most common classification scheme used in the USA is the FHWA 13 class scheme.
The following trademarks are used throughout this manual:
Windows® is a registered trademark of Microsoft Corporation.
MicroTally is a trademark of R&R Technologies, Inc.
WinTally is a trademark of R&R Technologies, Inc.
VehicleCounts.com is a trademark of R&R Technologies, Inc.
This section will lead you through the first time use and setup of the MicroTally.
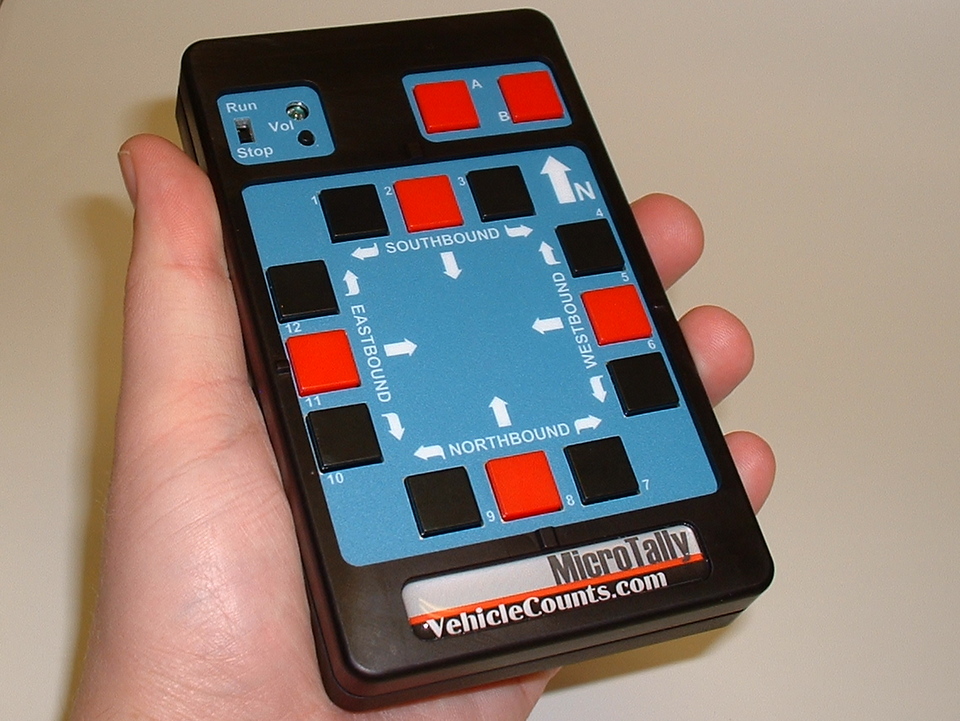
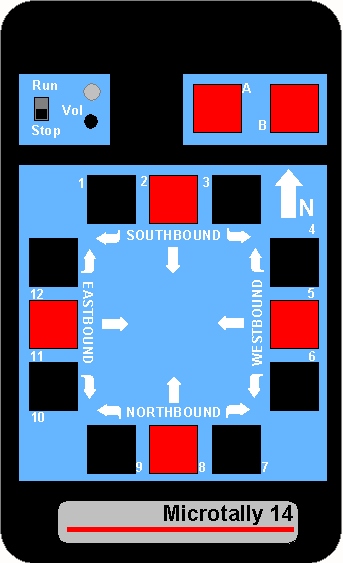
For the MicroTally 14, there are 14 tally keys organized in two groups, and for the MicroTally 18, there are 18 tally keys organized in two groups. The first group are the "intersection" keys. For the MicroTally 14 this group consists of 12 keys laid out at the four cardinal points of the compass, and for the MicroTally 18 there are 16 keys laid out at the four cardinal points of the compass. Normally when counting vehicles at an intersection, you record the count when a vehicle enters the intersection after you have determined the direction the vehicle will take. Vehicles entering an intersection may go straight through, turn left, or turn right (in some states U-turns are also a possibility, how to handle this will be discussed in a later section). Therefore, there are 3 keys on each of the cardinal points, labeled "Eastbound", "Westbound", "Northbound" and "Southbound" for this purpose. There are also right turning and left turning arrows next to the turning keys. There is an arrow indicating which direction is assumed to be North. The MicroTally 18 has four additional buttons in the corners which often are used for counting pedestrians as well. The second group of tally keys consists of two keys in the upper section labeled "A" and "B", these will be discussed in more detail in a later section.
There is a slide switch labeled "Run" and "Stop". This switch controls when the MicroTally is to be recording key presses. When the switch is in the "Run" position any press of any of the 14 or 18 tally switches will be recorded. The MicroTally generates a "Beep" on each key press. This lets you know that the key is being recorded. The beeps have different tones depending on the key location. The exception to this is when the unit is running in "silent" mode.
There is a button labeled "Vol". This button adjusts the volume of the beeps generated each time a key is pressed. This button is only active when the slide switch is switched to "Run". Each press of the button generates a double beep giving you an indication of the beep intensity. The intensity will decrease through 6 button pushes. The 7th press will disable the beeper, placing the counter in "silent" mode, however, the LED indicator (located directly above the button) will then "flash" with each key press. Pressing the button again will go back to maximum volume. Whatever beep state you select will remain until you change it.
There is a DB9 serial connector located on the top edge of the MicroTally. This is the communications connector. This connector may be connected to any PC serial port via a standard serial cable, or USB port with an appropriate USB to serial converter.
It is very simple to connect your MicroTally unit to your computer so you can download data, reset the unit (clear data), or enter a new unit ID into the unit. You must have a standard 9-pin serial cable or a USB-to-serial cable for laptops and other computers that don't have a COM port on them. Make sure the unit is off (the slider switch is in the "Stop" position), connect the MicroTally to the PC with your serial cable and load up the WinTally software. If the unit is in the "Run" position it will automatically be turned off when it is connected to your computer.
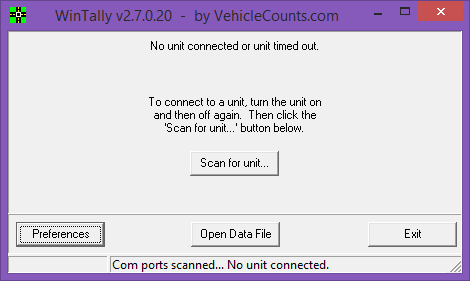
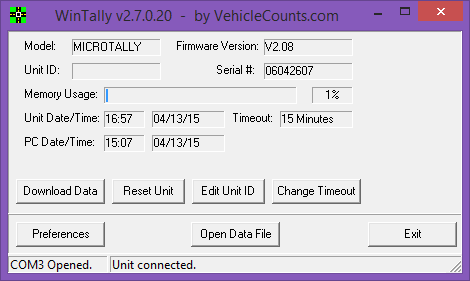
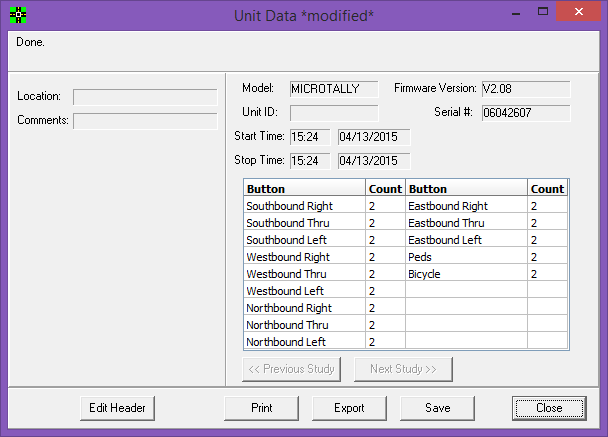
Once the WinTally software is loaded simply click on the "Scan for Unit..." button. When the unit is connected you will see the window change and you will then be able to see the Model, Firmware Version, Unit ID, Serial Number, and various other bits of information about the unit that is plugged in.
Note: The software may automatically connect to your unit without having to press the "Scan for Unit..." button.
When running your MicroTally for the first time, there are a few simple steps to follow.
If instead you see:
First click on “Scan for unit…”. If the problem persists, then check your cable and connections. Close WinTally software and then open it and try again. If you are using a USB to serial converter, make certain that its drivers have been properly installed. You can verify this in Windows® “Device Manager”. If you cannot establish communications with the MicroTally and you have checked everything to the best of your knowledge, feel free to call for technical help at 971-732-5075.
The MicroTally unit provides for manual counting with great flexibility as you will see in the following paragraphs. The MicroTally unit itself simply records all key presses with time-stamps, it has no awareness of how the keys will be utilized or interpreted. The WinTally software is used to download the MicroTally data and configure the key assignments and usage. This section describes the various ways keys on the unit may be used. For details on how to assign keys refer to the WinTally Software Manual. The MicroTally 14 has 14 tally keys, and the MicroTally 18 has 18 tally keys.
The A and B keys can be used as simple extra "tally" keys, or as "shift" keys for counting other types of data, such as pedestrians, bicycles, trucks, or U-turns. One of them could also be used as an "Undo" key to remove the last key pressed (in case you accidentally press the wrong key).
These keys are laid out simulating a typical road intersection. You can use these keys in a variety of ways also. Generally the 12 basic tally keys are used as "tally" keys and the A and B keys are assigned to "tally", "shift", or "undo" usage. However, you may use any of the keys including the 12 intersection keys, in any way you wish. Below are the various ways you can use a button. The way you used the buttons is assigned at the time of downloading the data from the unit.
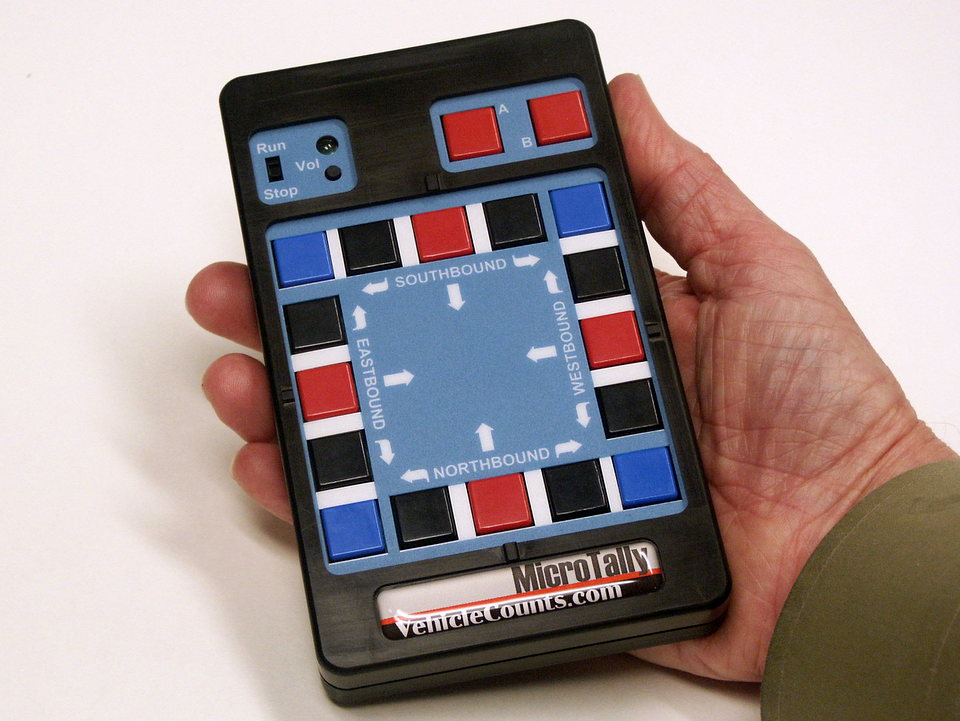
The MicroTally 18 also has four additional tally keys (the blue keys) that can be used for any purpose you might need. The most common usage is for pedestrian counting. Generally the 4 extra intersection keys are used as "tally".
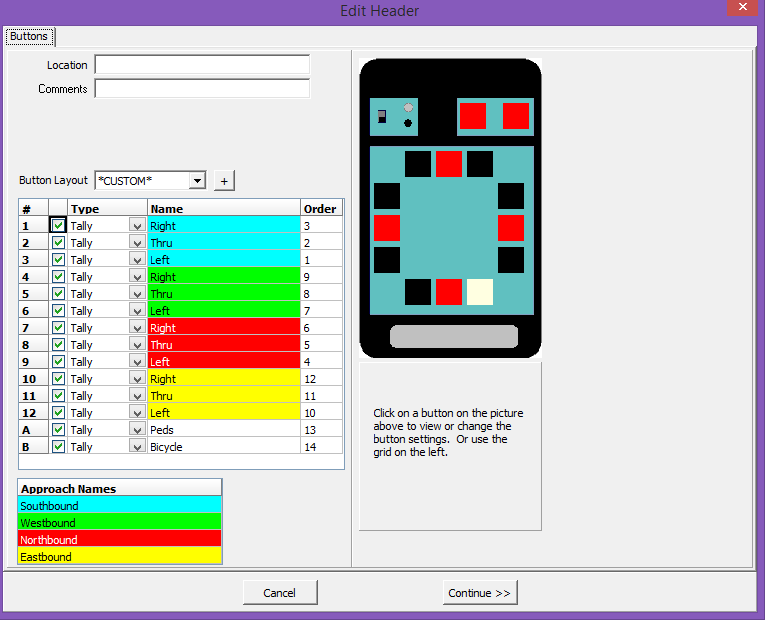
Below are the various ways you can use the tally keys. The way you used the keys is assigned at the time of downloading the data from the unit (or if you have saved the data, you can click on "Edit Header" after you open the file).
"Tally"
"Tally" type keys will just count the key presses for that key. This is the standard for most keys.
"Undo"
"Undo" type keys will erase the last tally key pressed (you cannot press this more than once to erase the last two -- only the last one).
Now for the more difficult ones to explain (easy concepts -- just hard to put in words):
"Shift"
"Shift" type keys will cause the next key press to be tallied in a different group, the name of the group will be whatever you name the shift key. You could make key "A" a shift key and name it "Pedestrians". Anytime you press the "A" key followed by a tally key, it will store that data in a separate "Pedestrian" bin. So in this example, when you download your data you will have 24 bins, 12 standard intersection ones and 12 "Pedestrian" ones. This scheme can be used for many different things, some of the more common may be pedestrians, bicycles, trucks, and U-turns.
"Shift Lock"
"Shift Lock" type keys will do the same thing as "Shift" type keys, only it STAYS ON until it is pressed again (which will turn it OFF) or another shift lock key is pressed (in which case the other shift lock key will be ON instead). It's easiest to look at the shift and shift lock like the shift and shift lock on a keyboard -- that's why we chose those names. So the Shift Lock will just save you some extra key presses required by using the shift key, however there's no way at the moment to know which (if any) shift lock is ON or OFF so it could be confusing until we add sound or something else to the units. Therefore, even though this mode is available, it is not recommended for normal use.
The MicroTally unit can be used to record several count studies before downloading the data. To do more than one study you'll need to keep track of the times or the order of locations so you can enter the information in when you download the MicroTally unit. Moving the slide switch to "Run" begins a study and when you are done with a study move the slide switch to "Stop". Then travel to the next study location. You then repeat the process to start and stop your study as indicated above. The WinTally software handles the separation of the studies automatically, you just have to enter in the locations. There is no limit to the number of studies a unit can hold. Except for, of course, the unit’s memory size (which can hold roughly 2 million button presses of data).
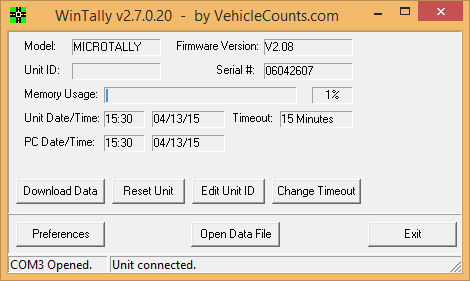
Note! If you forget to move the slide switch to "Stop" at the end of a study, the unit will automatically stop a study after 4 minutes (default) of no key press activity (a chirp will occur each 30 seconds until the slide switch is moved to "Stop"). This automatic stop time can be changed to suit your collection methods in our WinTally software by clicking “Change Timeout” when the unit is connected.
There is a small button which can be pressed to adjust the volume of the beeps from the unit. Each time you press the volume button (labeled "Vol") it will cycle through volumes. The volume setting you settle on will be remembered, so you don't have to adjust it every time. There are 7 different volumes (including a volume off.) If the volume is off the LED will flash each time a button is pressed.
The Run/Stop slide switch on the MicroTally has several functions. When storing the MicroTally for a long time the switch should be in the “Stop” position. The MicroTally only records the tally keys when the Run/Stop switch is in the “Run” position. The unit has an automatic "Stop" feature that will automatically issue a study end after 4 minutes of no key presses (as mentioned above, this can be changed in our WinTally software). If that happens, the MicroTally will "chirp" every 30 seconds to let you know that it did this. The chirping will stop when you move the switch to the “Stop” position. You will have to move the slide switch to "Stop" and back to "Run" to start the next study.
The unit should be "stopped" to communicate with a PC through the serial port. If you leave the unit in “Run” when you connect it to your computer then the current study will automatically end. You will have to turn the unit to “Stop” and back to “Run” before a new study can be started. Data will not be recorded if you are connected to an active serial port, even though the slide switch may be in the "Run" position.
Following are some examples of how the MicroTally would be used in collecting data for different modes. Remember all buttons can be assigned in any way you’d like (tally or shift), so really your imagination and ability to keep thing straight are your only limitations on how you can use the buttons.
This example simply uses the 12 intersection keys as "tally" keys. The "A" and "B" keys are not being used.
This example uses the 12 intersection keys as "tally" keys. In Wintally, the "A" key is assigned as a "shift" key with a name of "Trucks", the "B" key is not being used.
This example uses the 12 intersection keys as "tally" keys. In Wintally, the "A" key is assigned as a "shift" key and given a name of "Pedestrians"; the "B" key is not being used. Pedestrians crossing the North-side crosswalk are assigned to key 2, the East-side crosswalk to key 5, the South-side crosswalk to key 8, and the West-side crosswalk to key 11.
This example uses the 12 intersection keys as normal "tally" keys and to "tally" the first 12 FHWA classes and uses the “A” key as a “tally” key for “Class 13”. In Wintally simply name each button with it’s FHWA class. The “B” key is unused (optionally this could be used to indicate lane or direction if you assign it a shift key). The FHWA vehicle classification scheme places all vehicles into one of 13 classes (or categories).
To get up to 7 types of vehicles with their corresponding turning movements you need to have a MicroTally-18, with a MicroTally-14 you can get up to 3 types of vehicle classifications with their turning movements. This example uses the 12 intersection keys as "tally" keys. In Wintally, the "A" key is assigned as a "shift" key with a name of "Class 2”, the "B" key is assigned as a “shift” key with a name of “Class 3”. If you have a MicroTally-18 each of the 4 blue corner keys can be assigned as a “shift” key and named “Class 4” thru “Class 7”.
This example simply uses the 12 intersection keys as "tally" keys. The "A" key will be assigned as a “Video” key. The "B" key will not be used. When a key is selected as a “Video” (or “Video Interval”) key you will get to enter a video interval (in minutes), this is how often this button is pressed according to the video time you will also be prompted to enter a video start date/time. When doing this, normal key timestamps are ignored, and instead each key press is dropped into whatever the current video interval is. (i.e. for each 15 minutes of video you can press the A button, the software will then know in what interval all of the key presses occur).
There are a variety of reasons that can cause count results not being what you expected. This chapter will discuss a variety of causes of unexpected results and how to remedy them.
The MicroTally timestamps can only go for about 8 months before the counters “roll over”. If you have not used the MicroTally for several months and you switch the MicroTally from “Stop” to “Run” and the unit is in a continuous rapid beep, that is an indicator to remind you to reset the unit before using it for a study. To do this, connect the unit to WinTally. When the communications status screen pops up, press the “Reset Unit” button. The rapid beeping will stop and you can now safely collect data with it.
As mentioned above, the MicroTally only records what key has been pressed and when it was pressed, it is totally unaware of what the keypress will be used for. If your data summary or reports seem to be wrong, you need to go back and carefully review the key assignments. Particularly look for wrong key type assignments. The most common problem is finding a key assigned to “tally” when it was supposed to be “shift”. Key assignments are detailed in the WinTally software manual.
The MicroTally uses beeps to indicate switching from “Stop” to “Run” and visa versa, and also when any of the tally keys are pressed in the “Run” mode. If the unit is not beeping when you expect it, check the LED light above the “Vol” switch. If it is blinking each time a key is pressed in the “Run” mode, then the unit is in “silent” mode. Press the “Vol” switch to reactivate the beeps.
if all your connections are good, the most likely problems are improperly installed or outdated USB to serial converter drivers, or Windows permission issues. If you are a current user and are having this issue when trying to install on a new computer, then try to update the USB to serial drivers with the manufacturer, or try another USB to serial converter. If you are in a larger company that has IS install your software, it could be a permissions issue. Likewise, if you are upgrading to Windows 8 or higher, you will need administrative rights (for single users this is not a problem). If you are a first time user, and the above advice does not seem to correct the problem, then see if you can find an older PC to install the software on to at least make sure all is working. If that works, then your problem has to be the serial drivers or permissions issues of some sort.
If you are still experiencing problems feel free to contact technical support at 971-732-5075, or email: support@vehiclecounts.com.
Power: | |
Internal Battery: | 3.6Vdc Lithium type AA soldered in. |
Battery Life: | 6 years typical |
Indication: Type: Maximum Count: | Beeps or LED 500,000 keypresses |
Memory: Type: Size: | Flash 2 Megabytes |
Environmental: | |
Operating Temperature Range: | -4 F to +158 F -20 C to +70 C |
Relative Humidity: | 5 to 100% |
Physical: | |
Dimensions: | 5.80 x 3.48 x 0.87 inches 148 x 88 x 22 mm |
Weight: | 12 oz 343 grams |
Enclosure Materials: | Anodized Aluminum, and Lexan. |